Programming the LoL Shield using animated GIFs


A couple of weeks ago, I was hacking on the LoL Shield with Nathan Rosenquist, when we realized that it was really time consuming to use the spreadsheet program to build animations. Never fear, a quick python script later and we could generate animations automatically from animated gifs.
Using the program, you can take black & white 14×9 GIF animations of (probably) any length, such as the following one by Nathan:

and get some code ready for the LoLing:

uint16_t ripple[][9] PROGMEM = {
 { 520 , 1028 , 2050 , 2050 , 2114 , 2050 , 2050 , 1028 , 520 , },
 { 2050 , 4097 , 4097 , 8256 , 8352 , 8256 , 4097 , 4097 , 2050 , },
 { 8192 , 8192 , 224 , 272 , 272 , 272 , 224 , 8192 , 8192 , },
 { 0 , 224 , 272 , 520 , 520 , 520 , 272 , 224 , 0 , },
 { 224 , 272 , 520 , 1028 , 1028 , 1028 , 520 , 272 , 224 , },
};

Here’s the python source, have fun! It requires Python and the Python Imaging Library (PIL):

#!/usr/bin/python
# Python script to convert a 14x9 pixel animated gif into a format that can
# be displayed on the LoLShield.
#
# Requires Python and the Python Imaging Library (PIL)
# It would be nice if this was available using a more common language.
 
import sys, os, Image
 
class ImageSequence:
    def __init__(self, im):
        self.im = im
    def __getitem__(self, ix):
        try:
            if ix:
                self.im.seek(ix)
            return self.im
        except EOFError:
            raise IndexError # end of sequence
 
# Open image
filename = sys.argv[1]
filenameBase = os.path.splitext(os.path.split(filename)[1])[0]
im = Image.open(filename)
 
# Print the variable declaration
print "uint16_t " + filenameBase + "[][9] PROGMEM = {"
 
# For each frame in the image, convert it to black & white, then into the
# LoLShield format
for frame in ImageSequence(im):
    # Convert to black and white
    converted = frame.convert("1")
 
    print " {",
    frameString = converted.tostring()
 
    # For each row in the image
    for row in range (0, 9):
        charA = ord(frameString[row*2])
        charB = ord(frameString[row*2 + 1])
 
        rowTotal = 0
        # Handle the first 8 bits
        for col in range (0, 8):
            shiftAmount = 7-col
            rowTotal += ((charA >> shiftAmount) & 1) * 2**col
        # Then the next 6
        for col in range (0, 6):
            shiftAmount = 7-col
            rowTotal += ((charB >> shiftAmount) & 1) * 2**(col+8)
        # And output the total for this row
        print rowTotal, ",",
    print "},"
print "};"
Posted in tech | 8 Comments

Idea: Ceiling cat smoke detector

image

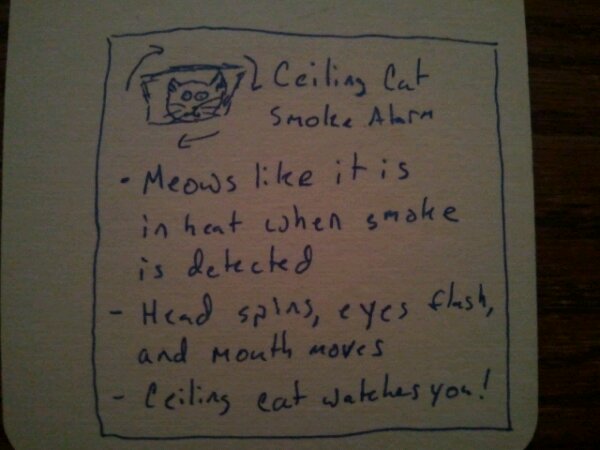
Like any ceiling cat, the ceiling cat smoke detector watches you doing private things. This cat has another function, however- it also detects fire in your abode, and warmly alerts you to them with the moaning wail of an excited feline who seeks affirmation of their existence through copulation. Bonus features include a rotating head, flashing eyes, and articulated mouth.

Posted in Uncategorized | 1 Comment

Midwest Workshop Tour of Hackerspaces

For the rest of the month, I’m going on tour with Mitch Altman and Jimmie Rodgers as their official roadie. We’re visiting a number of hackerspaces in the Midwest, and holding soldering workshops at them. They started their journey a week ago in Canada, and I joined up with them on Sunday in Detroit. I’m planning a more in-depth series of blog posts for Make, but for now here are the pictures from the first workshops, and our schedule:

OCD (Detroit, MI): workshop on 8-August
Mt. Elliot Makerspace (Detroit, MI): workshop on 9-August
i3Detroit (Detroit, MI): workshop on 10-August
A2 MechShop (Ann Arbor, MI): visit on 11-August
AHA (Ann Arbor, MI): workshop on 12-August
LVL1/Actors Theatre (Louisville, KY): demo on 13-August
LVL1 (Louisville, KY): workshop on 14-August
Hive13 (Cincinnati, OH): presentation on 17-August
Hive13 (Cincinnati, OH): workshop on 18-August
BloomingLabs (Bloomington, IN): workshop on 19-August
Arch Reactor (St. Louis, MO): workshop on 20-August
KC Mini Maker Faire / CCCKC (Kansas City, MO): Hardware Hacking Area at Faire on 22-August
Quad Cities Co-Lab Hackerspace (Quad Cities, IA/IL): workshop on 24-August
PS:1 (Chicago, IL): workshop on 25-August
Madison BarCamp (Madison, WI): talk on hackerspaces on 28-August
Sector67 (Madison, WI): workshop on 29-August

Posted in Journal, Photo | Leave a comment

Idea: Audio instrument designed by combining many open sourced kits

image

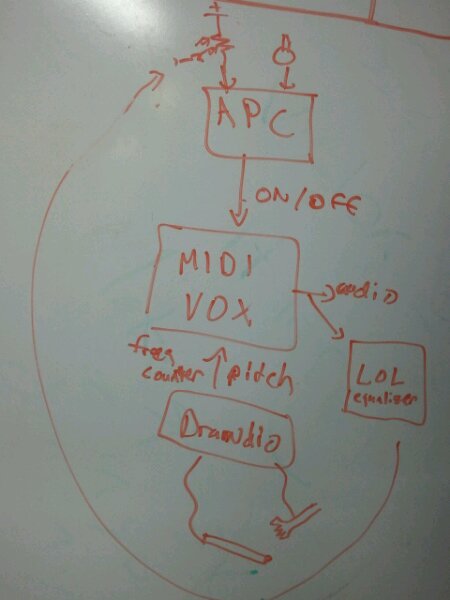
The idea its to modify the MIDI VOX to accept input from both the drawdio and atari punk console, including a graphic equalizer on a lol shield with possibility of feedback into the apc, to create an instrument with maximum blog cred.

Posted in Ideas | 1 Comment

Idea: Synth Shirt

image

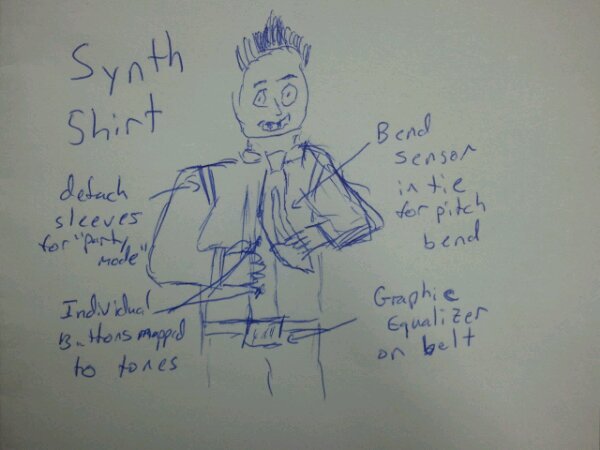
The synth shirt is a portable expressive instrument that you can wear on your body and perform at any moment. There are many possibilities for the design, however a good single voice version consists of a button down shirt with real electrical buttons for buttons, which each correspond to a single tone, and a tie with a bend sensor built in to do pitch bending for more expressiveness. Also, the shirt has detachable sleeves which, when activated, put the shirt in party mode for maximum fun. An optional belt buckle works as a graphic equalizer and drum machine.

Posted in Ideas | 2 Comments

Funny lightswitch tells tale of design evolution

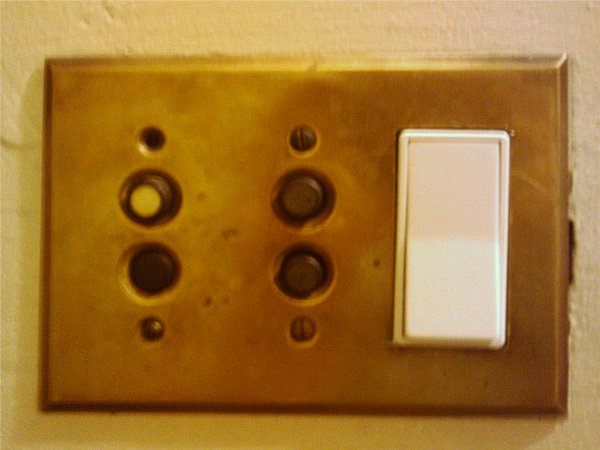
Light switch technology has come a long way from antique push button light switches to modern rockers, and what better way to celebrate this achievement than to put them both in the same fixture? This setup controls the lights in the entryway to my new apartment. I’d love to take the plate in for a replacement, just to see the look on the salespersons face…

Posted in Journal, Ridiculous | 3 Comments

Meggy Jr Sr progress

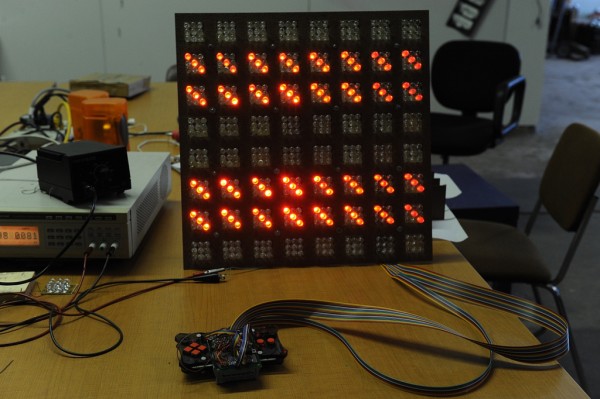
Over the past few days, I’ve been working on completing a project thats been on my mind for a while. The idea was to build a giant version of a MeggyJr RGB pixel game kit by Evil Mad Scientists, like what a big box store might use as a display unit in an alternate future where they sell cool electronics kits. The project has morphed a bit over time- originally, it was to be just a scaled up version of the handheld, complete with giant buttons and buzzer. I may still attempt that in the future, but for now the project consists of a large LED grid that works as a drop-in replacement for the regular-sized screen.

There’ still a reasonable amount of work to do on the project, but it’s getting closer, and this morning I was finally able to play the MeggyBrite program on a large grid :-). I still have to finish the enclosure and add a diffuser screen, however this seems like a good time to put up some documentation, so here goes:

There are three main components to the project: the RGB pixels, the laser cut enclosure, and the Meggy adapter board. Here’s an archive of all of the design material needed to make the board, and a short description of each component of the project.

RGB pixels

For whatever reason, I envisioned the display as being made up of a bunch of discrete pixel units, which would then be wired in a grid. Looking back, this is a pretty foolish way to build it (better would be to use larger breadboards, or pre-made modules like the ShiftBrite). Anyway, I had a whole bunch of 10mm LEDs, so I decided to design up a board to fix 3 each of the red, green and blue LEDs, forming a single RGB pixel. You need 64 of these for the whole array. I made them by hand using pre-sensitized PCBs, as explained in Collin Cunningham’s Circuit Board Etching tutorial. Thanks to Issac for helping me solder them together!

Adaptor Board

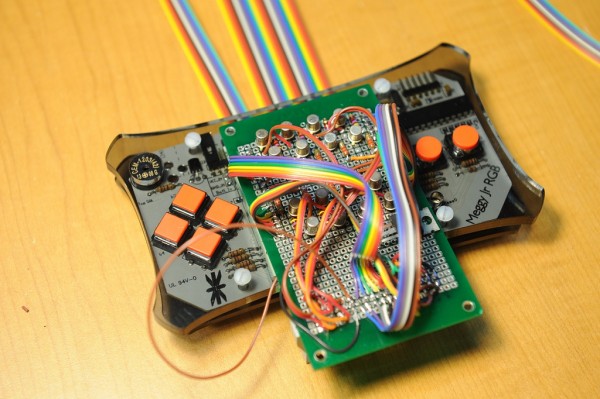
The adapter board is designed to plug into an unmodified MeggyJr, so that you can use it in portable mode with the regular screen, or go for the large screen edition at home. It has pass-through connections for each of the 24 column connectors, and a step-up driver on each of the 8 row drivers, allowing the Meggy drive hardware to control the higher voltage required to run the sign. Finally, it has an LM7805 chip to provide power to the Meggy. I didn’t draw up a schematic though, so you are on your own for this one :-).

Enclosure

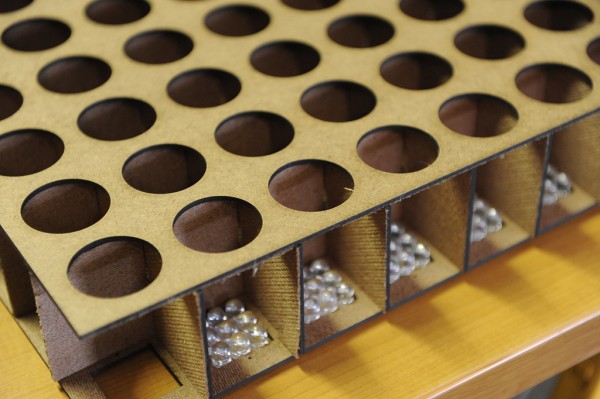
The enclosure is meant to look like a large version of the 8×8 RGB display. I drew up a design in Inkscape, and my friend Brandon Barber laser cut it for me in hardboard. The basic form is right, but I had to make a bunch of modifications, so I’d suggest using the design files as inspiration only.

I’m planning to have the display set up at our Hack Pittsburgh table at Maker Faire Detroit, so you should stop by and check it out!

Posted in tech | Leave a comment