
Some time ago, I picked up an LCD photo frame that was on clearance, however it’s screen quality turned out to be quite unsuitable for actually showing photos. I wasn’t sure what to do with it, but I thought it would be a shame to waste the thing, so I decided to turn it into a ridiculous clock.
The idea is pretty straightforward, I just built a circuit to hit the ‘next’ button every minute, then generated 720 photos to store on it, one for each minute in a 12-hour cycle. I chose to write out the time in words, however really anything could be used and displayed. Build instructions after the break.
Building the clock
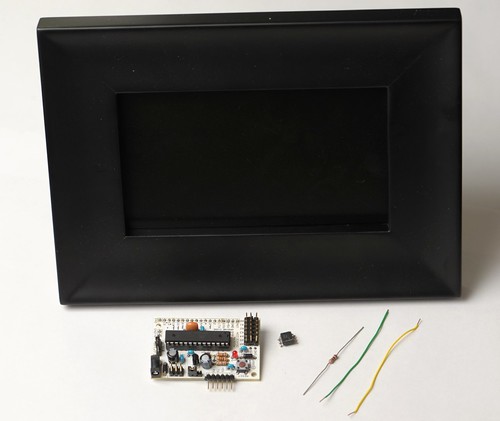
To build the clock, you will need an extra LCD photo frame, an Arduino microcontroller (the Bare Bones Board Arduino clone is shown here, but I ended up using a Really Bare Bones Board), a 4N25 optocoupler, a 100 ohm (or so) resistor, and some wire. Optionally, you can also make a new frame for your clock using some matting.
1. Wire a microcontroller to the clock
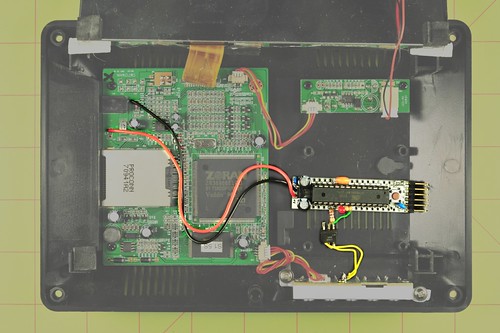
To make the clock advance every minute, I wired up an RBBB Arduino clone to the forward button, and programmed it to press the button every minute. I used a 4N25 optocoupler to simulate button presses. Here is the schematic:

And this is what it looks like, installed (new parts highlighted):
2. Program the micro to trigger the optocoupler every minute
Here is the Arduino sketch that I am using:
#define forwardButton 12 // Initialize the IO ports void setup() { pinMode(forwardButton, OUTPUT); digitalWrite(forwardButton, LOW); } // Main loop void loop() { unsigned long startTime = millis(); unsigned long temp; // Pretend to be a regular clock, and tick once a second. while (true) { startTime += 60000; // 60000 milliseconds per minute // Advance the time digitalWrite(forwardButton, HIGH); delay(300); digitalWrite(forwardButton, LOW); // Wait until a minute has passed. Note that this will do ugly things when millis() // runs over, so it might get messed up after 50 days- check back here for an update! while (startTime - millis() > 0) {}; } } |
3. Generate a set of pictures to represent the time
After the circuit is set up, we have an LCD photo frame that advances to the next picture every minute. To turn it into a clock, we have to generate an image to represent each minute. It could be fun to make one that has a different photo background every minute, that shows a really slow animation, or that slowly fades between colors- the choice is up to you.
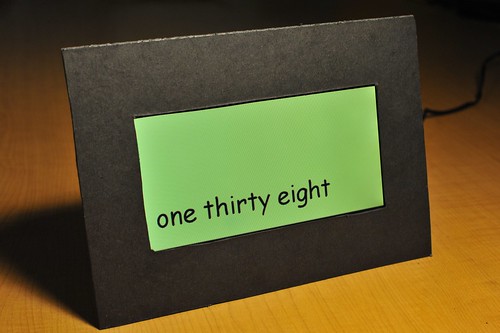
For mine, I decided to keep it simple and make one that shows the words written out in English. I played around with slightly different picture sizes, colors and fonts until I found something that looked good on the LCD:

There are couple things to note here. First, the colors look really ugly on the computer screen, but the photo frame interprets this as a pleasing shade of green. Second, my photo frame insists on displaying an indicator graphic every time the forward button is pressed, so to get around this, I just put electrical tape over that part of the screen and then made a matte frame to cover the tape.
Once I had an image that I liked, I made a Processing script to generate a picture for each minute:
// Set these to match the resolution of your clock int imageWidth = 480; int imageHeight = 260; // Adjust these until the display looks right int textSize = 45; int textStartX = 30; int textStartY = 220; String[] onesStrings = { "twelve", "one", "two", "three", "four", "five", "six", "seven", "eight", "nine", "ten", "eleven", "twelve", "thirteen", "fourteen", "fifteen", "sixteen", "seventeen", "eighteen", "nineteen" }; String[] tensStrings = { "twenty", "thirty", "forty", "fifty" }; PFont myFont; // Print the specified time onto the screen void drawTime(int hours, int minutes) { // First, add the hour String timeString = onesStrings[hours%12] + " "; // Then, build the minutes if( minutes == 0 ) { // 0 minutes means it's right on the hour. timeString += "o'clock"; } else if( minutes < 10 ) { // 0 - 9 timeString += "oh " + onesStrings[minutes]; } else if( minutes < 20 ) { // teens timeString += onesStrings[minutes]; } else { // first find the 10's digit timeString += tensStrings[minutes/10 - 2]; // then add a 1's digit if applicable if( minutes%10 > 0 ) { timeString += "-" + onesStrings[minutes%10]; } } // Write the time out to the screen at the specified coordinates text( timeString, textStartX, textStartY); } void setup() { // Set the screen to the size of our LCD, so that it doesn't have to resize the image size(imageWidth, imageHeight); // I use Comic Sans because it looks best. myFont = createFont("Comic.TTF", textSize); textFont(myFont); // Set the drawing to black stroke(0); fill(0); // Keep a count of how many images have been generated, to use to generate unique // files names. int count = 0; // Create an image for every minute of every hour. for( int hours = 0; hours < 12; hours++ ) { for( int minutes = 0; minutes < 60; minutes++) { // Clear the background by painting over it background(230, 184, 0); // Draw text for the current time cycle drawTime(hours, minutes); // Write out an image file. The filesystem on my SD card wouldn't allow // more than a few hundred images in a single directory, so I break them // up into groups of 200. save(count/200 + "/" + count++ + ".jpg"); } } } |
4. Load the picture into the photo frame
My frame reads photos from an SD card, so I loaded one up and stuck it into the frame. One issue I ran into is that the FAT filesystem that my card was formatted with didn’t like having 720 photos in a single directory, so I broke them up into groups of 200 (the script above does this automatically). Once everything is loaded, the clock should be good to go. To set it, press the forward button a bunch of times until you get to the right time (it is tedious).
5. Enjoy!
Set the clock on an endtable, hang it to the wall, or give it out as a gift!
Possible improvements:
- Add second optocoupler, to automatically press the ‘pause’ button when the frame starts up
- Do something more interesting with the graphics display (photos? changing colors? human clock?)
- Add an ambient light sensor, and use it to control the brightness of the LCD backlight.
Did you have to manually type “one zero all the way to “twelve fifty-nine” or did you have a neat trick to get around that?
@Alex
I wrote a quick program to do it for me, it’s included at the end of the entry
Coolness upgrade: get everyone you know to take pictures of actual clocks – digital, analog, wrist, in the car, outside banks, from phones, computer screens, sundials – then arrange them in order.
Excellent idea! I may have to do this myself in the near future. Two small things you may wish to correct are the spelling of “forty” and the hyphenation of all numbers like “forty-two”. It’s the English teacher in me coming out.
What program would I enter the script into to generate the pics?
It’s forty, not fourty. You might want to change the main picture dude
@Derek
Hi Derek, the program is written for Processing (http://processing.org/). It’s an open source programming environment for visual arts, written in Java.
@Will Thanks, I totally missed the ‘forty’ misspelling, and wasn’t sure if the other numbers should be hyphenated.
Nice use of a program to make the images for you. I was originally thinking that you made them individually!
Great and simple re-purpose project!
@Pat There is a website with photographed numbers for the time at http://www.humanclock.com/ (to be used for inspiration only of course )
)
It shouldn’t be a problem to have 700 files in a single directory, but for FAT16 filesystems, there is a limit for files in the root directory (512 for the 1GB SD card I had a look at recently, also note that files with long filenames require several directory entries per file). For subdirectories there is no limit on how many files they can contain (except the size of the SD card), same goes for all directories (including root) on FAT32.
Pingback: DIY Word Clock from old digital photo frame - SlashGear
@Alan Parekh Thanks! It would have take extreme dedication to make all of the photos by hand.
@Pete Thanks Pete!
@arne Hmm, those numbers make a little more sense. The Nautilus file manager complained after I think about 300 files in the root directory of my 2GB card, but since the multiple folder trick work, I didn’t investigate further.
A really nice idea…except for the use of Comic Sans.
Pingback: Sometimes I hate the world. Sometimes I love humanity. » Meta-Nixie Clock
Pingback: Ideas based on photo frame clock - Hack a Day
Oh shit, comic sans again… May be its cool for your baby or your blondie girl…
Nice, could we have a nice sped up video of it? Not for a full 24 hours obviously (unless you want to).
Interesting project though. I think that the random time images idea would be pretty cool. It would add interest to it and it would be fun to occasionally see a new image that you had forgotten was there at a certain time. How accurate is the time keeping? I can’t see a RTC anywhere.
Mowcius
Thanks! Sure, I can make a video, actually it could be pretty neat if I put it somewhere where there is lots of activity / shadow from the sun.
A realtime clock would certainly make it more accurate, I’ve thought about it but haven’t gotten around to ordering one
Pingback: Jan-Piet Mens » Time on a left-over photo frame
Great idea, but I have a problem! (Not that one)
I get the error “A null PFont was passed to textFont()”
Can anyone clarify what this is? Thanks
My guess is that you don’t have a copy of the font that the program is looking for (Comic.TTF). Try using this function to list all of the fonts that are available on your system, and substitute in one of these:
String[] fontList = PFont.list();
println(fontList);
Yes, I sussed it in the end. The font name is case sensitive aswell, so for me it should have been “comic.ttf” not “Comic.TTF”
I was a bit hasty to post really, but hey, its all a learning curve.
@ConfusedNoob
Ha, no worries, glad you got it working! Be sure to let me know when you get your project working!
Diggin’ the photoframe hack!
Thanks!
Pingback: New uses for Digital Picture Frames? - HEXUS.community discussion forums
Hey, that DPF is using a Zoran Vaddis chip that is found on many DVD players, it can surely decode MPEG1/MPEG2. ¿What about hacking the firmware to play video?
Andm btw, the Vaddis i think that can’t interface do digital LCD’s, that’s why the quelity sucks, like those chinese portable DVD players (Digital DVD to analog to digital LCD always looks like crap)
Hey, thanks for the insight! Hacking the firmware could be fun, but if the quality sucks, whats the point ;-). It makes for a strange situation when building a system that has an extra set of DAC and ADCs is cheaper than a straight digital one…
That said, if the monitor can take an analog input… hmm! I hadn’t looked at it because I figured it would be too much bother.
I need help. I am building a project that similer but has one extra requirement. I need the frame to be able to turn on and off and still remember the last picture in the order. example: picture 12 out of 20 is on the screen. Powers off.. powers back on and pic 12 is still on the screen? Any ideas anyone?
Does anyone know the Model of the photo frame used in this hack?
Hmm, that would be a handy feature to have. Unfortunately, I didn’t keep the box for this one, so I don’t know the model number :-(, but it doesn’t seem sophisticated enough to do what you are asking for.
Would it be possible for it to just blank the screen, or does the power have to turn off and on?
i want to do this project but i cant understand the software side. i downloaded the processing script at http://processing.org/. I then run and save your script to the SD cards but nothing happened. How can i make your program run on my photo frame? Please help me. I really like your project.
Hi Chips,
Sorry to hear you are having trouble! The way the script works is that you run it on your computer to generate photos, which you can then place on your SD card. If you already have processing running, then you are most of the way there. You will need to copy the script from this page into a new Processing sketch, run it, and then copy the photo directories that it creates onto your SD card.
Have you built the Arduino portion of it yet?
Cheers,
Matt
Thank you Mahto for your quick response. I keep on putting the program to the SD thinking that it will be like an autorun thing, silly me. It is now working!!! I used my spare microchip to drive a robotic hand to press the forward key every minute. Kidding aside, many thanks for helping me understand it. I’m so happy with my DPF now. More power to you Mahto!!!!!
Awesome!!! Do you have any pictures of it? The hand idea sounds wonderful :-).
People sell a simple photo-frame clock for £64.99. I bet you could beat that, and give people more design choice in how they wante the time displayed.
Thanks for the idea. My Steps were.
1. Create both number and words for each minute using Excel.
2. Export the content as csv with columns for: HH:MM, Words, Number 001 to 720 (so I can use it as the filename to keep them in order). see http://www.shersonmedia.com/clocknumbers/clockit.csv NB excel removes leading zeros which you will need to put back before using.
3. Create a web page with two fields and style it.
4. Use iMacros to loop through the csv putting the numbers and word in fileds and saving a snapshot usnin the number as the filename.
5. Batch process the images with photoshop to crop to the size of the screen.
http://www.shersonmedia.com/clocknumbers/027.jpg
My digital picture frame word clock is a bit simpler and uses the built-in automatic slideshow feature. You can check it out at dpfwordclock.com