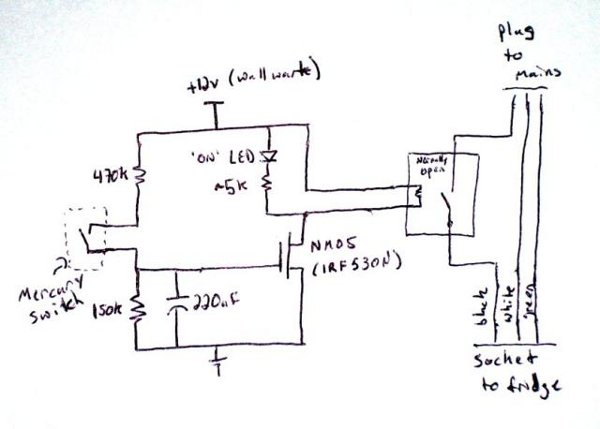
I finally got around to brewing some Hefeweizen, however I quickly realized that it was necessary to use refrigeration to keep the beer fermenting at the proper temperature! Never fear, a mercury switch, relay and a few resisters later and we have a fine temperature regulator for the fridge. Just set the fridge’s regulator to something lower than the desired temperature, and plug it in! Here is a hand-drawn schematic of the operation:
Quick Instructions:
1. Splice NO (normally open) relay connection onto black wire on the extension cord. Attach long piece of 2-strand wire to 12V connection on relay
2. Figure out which connections on the thermostat correspond to the air conditioner output, and attach another piece of 2-strand wire to these outputs. They were red (RC tied to RH) and yellow (Y) on mine. There is possibly a ~6k resistor in parallel with the switch. Disconnect this. Verify that the switch shows high impedance when in a cold state, and shows low impedance when in a warm state.
3. Assemble the circuit on a protoboard, and hook up the mercury switch and relay control as indicated. Do not connect the mains connectors at this time. Verify that with 12V applied, the relay will switch on if the temperature is above the setpoint, and will turn off when the temperature goes below the setpoint for an amount of time. There should be a sizable delay (>30s) between the time that the switch changes state and the relay kicks on. This delay is caused by the 22uF capacitor, and is there to protect the compressor pump on the fridge. Try shaking the mercury switch- the relay should not change state.
4. Try the relay by plugging a lamp into the extension cord. If this switches on and off appropriately, then place the thermostat in your fridge, set the temperature, and plug the fridge into the relay output. Happy brewing!
Parts List:
* Old mechanical thermostat (or just rip the current one off of your wall and replace it with a programmable one)
* 12V wall wart
* 120V/10A SPDT Relay with 12V coil (Radioshack #275-248A worked ok)
* Project enclosure for relay
* Heavy-duty Extension cord to canabalize
* NMOS transistor, IRF530N (or something like it)
* 470k, 150k resistors for time delay/debounce circuit
* 220uF cap for debounce circuit
* 47pF cap for power supply decoupling (not shown but recommended)
* LED and 5k resistor for status light
* some feet of 2+ strand wire (for connection to thermostat and to relay, phone cable works ok)

